
CORE WORK IN PREGNANCY
I’m about to close the chapter of pregnancy in my life for good, but before then, I wanted to make time to share on this topic. It’s a question I have received multiple times in my teaching career. Not to mention, it is SUCH important information – for mommas to be, future mommas to be, and all types of movement teachers/trainers/therapists. I have been to multiple yoga classes while pregnant, and have not always received guidance in this, and feel this is an important offering so that you can advocate for yourself or your students or clients.
WHY is this important?
Strong core work is discouraged during pregnancy. Crunches of any form, ab machines, swimmers, even core-heavy yoga poses (ex: traditional boat pose) – any work that causes you to constrict your “six pack muscles”- can actually be a detriment during pregnancy because they can lead to, or worsen, diastasis recti.
What is diastasis recti?
Hang with me here – I have to nerd out for a second. Here is a quick overview of our core musculature:

It’s worth noting that it is so much more than a “six pack.” The core is a multi-layered system, front, back, and sides, including the diaphragm on top and the pelvic floor muscles on the bottom. Muscles wrap in different directions, overlaying each other in perfect balance to hold our abdominal and pelvic organs, assist with breathing, and support our spine and posture. The core can be thought of as an strong elastic balloon that expands and contracts, and holds enough integrity to keep our bodies upright and stable. Healthy core work will utilize and challenge ALL these muscles.
Diastasis recti is a separation of the front core muscles, the rectus abdominus. These muscles run in two parallel bands down the front of our abdomen. Due to the growth of the uterus, which lays underneath this layer of muscle, these muscles are pushed out and stretched – sometimes, so far that the two bands, normally close together, pull apart, leaving a wide gap in between. This leaves nothing but a thin layer of connective tissue to hold in our abdominal organs once we give birth. Severe cases can even cause displacement of these organs.

This condition is actually quite common, affecting up to 2/3 of pregnant women, and doesn’t mean we did anything wrong. BUT, there are choices we can make; namely, being mindful of our movement patterns. AND, good news, if we experience diastasis recti, the gap can be closed with targeted and mindful postpartum movement. (Stay tuned for a future post!)
So what does heavy core work have to do with this?
The tightening and toning of these bands of muscles away from each other, that happens during these moves, can pull and strain the connective tissue (linea alba) even more, hence a worsening of diastasis recti.
So, WHAT IS our goal with prenatal core work?
The goal of core work during pregnancy is mindful strength of the right muscles, AND softness. We need strong muscles to contain our organs and growing baby, help us maintain good posture, and offer support to our spine. They can also help ease discomforts of pregnancy such as lower back pain (and can even help us manage – real talk – bladder leakage!) and of course is crucial during labor and delivery to assist in pushing the baby through the birth canal. BUT, we want to offset this strength with softness. Enough elasticity to allow our bodies to gently expand, put the least amount of strain on our other tissues, and of course lead to the necessary pelvic opening so that the baby can pass through. This is especially important when it comes to the pelvic floor – we want STRONG and LONG.
Okay, okay, finally – WHAT core work IS recommended?
All these moves are focused primarily on the deeper core muscles (namely, the transverse abdominus) and the pelvic floor. Remember, we’re working for STRENGTH and LENGTH.
CORE PRACTICE FOR PREGNANCY:
WHO are these movements good for?
Women during any stage of gestation who are experiencing a normally progressing pregnancy and are cleared to exercise by their OB/GYN.
WHERE should these be practiced?
On a yoga mat or a firm carpet. Many of these moves ask us to be on hands and knees, or other joints, so offer your body support as needed. A firm blanket works well.
WHEN should these be practiced?
As often as our energy allows. I know that levels fluctuate (often day to day!) so always honor your body and how you are feeling at any given time. That being said, this work can be incorporated into daily practice if that feels appropriate.
If you’re in a general group class and there is a core section offered, don’t be afraid to sit out boat pose! Sub one of these moves in. Remember it’s YOUR body and YOUR practice.
Breath warm up: Find a comfortable seat and support the hips as needed with a firm folded blanket or cushion. Close your eyes and begin to become aware of the breath. A tight pelvic floor can be a symptom of lack of proper deep breathing. Begin to gently lengthen out the inhales and exhales in a way that feels comfortable, but be sure to listen to your body and never hold the breath while pregnant. Inhale, visualize your side ribs, diaphragm and pelvic floor all expanding open like a soft balloon. Exhale, feel the side ribs draw in, and the pelvic floor lift and gently contract. Continue for 10 breaths.

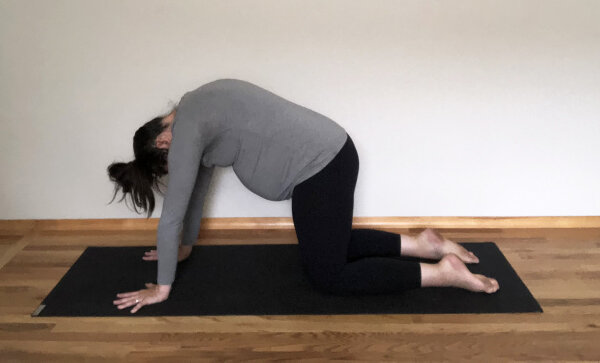
Body warm up: Cat/Cow. Use these movements to become aware of the center of the body. Feel a gentle stretch on the inhale, and on the exhale hug the baby to the spine. Use this time to link breath with movement – this will be important during this practice. Option to come onto the fists if the wrists get uncomfortable – carpal tunnel is common during pregnancy due to our increased blood volume. Cat/Cow movements can also help encourage the baby to get into proper position for birth.

Pointer dog: Keep the baby drawing in to the spine and imagine the low back being spacious BEFORE lifting the foot. Press back with one leg. Square the hips to the floor and keep the back foot active with the toes pointing down. When you feel stable, lengthen the OPPOSITE arm in front of you, keeping the shoulder away from the ear. Keep drawing the baby in to the spine. Without actually moving the body, imagine drawing the front fingers and the back heel TOWARD each other – you’ll feel the back muscles engaged. This engagement is stabilizing for the SI joint (another common area of discomfort during pregnancy). Stay here for 5-10 breaths – remember, DON’T hold your breath. If you find yourself losing your breath ever during this practice, come out of the posture. Repeat on other side. BONUS FACTS: This move will challenge your balance. It also requires the same part of our brain that a baby uses when it learns to crawl!

Pointer Dog curl-ins: Come back to side one of pointer dog. From the original position, inhale. Exhale, hug baby to spine, and draw front elbow and back knee toward each other (as much as you can with your cute baby belly!) Repeat 5-10 breaths, and switch to other side.

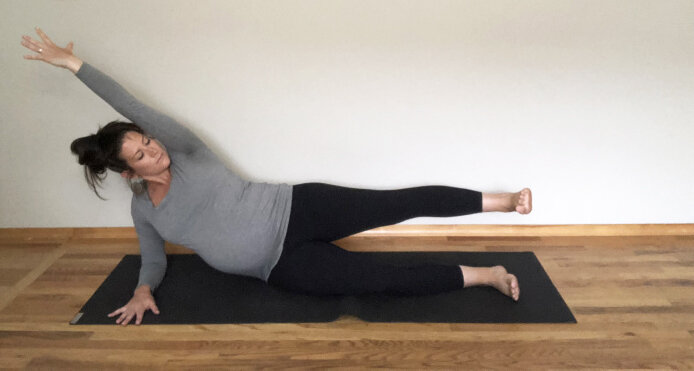
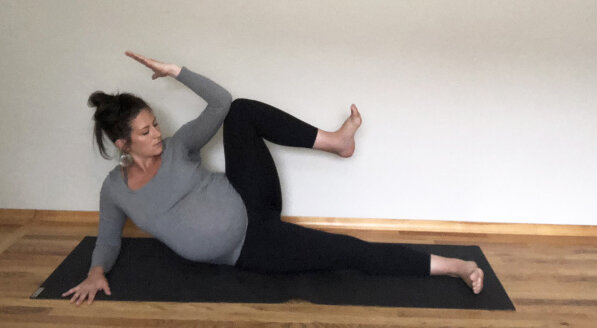
Oblique strengthener: Come on to one side and prop up with your elbow (use blanket for elbow/hip support if needed). Keep shoulders down back, and again hug baby to spine. Inhale, lengthen the leg and arm away from each other. Exhale, draw the elbow and knee together, focusing on your side waist during this movement. Repeat 10 breaths.
Outer hip strengtheners: The gluteus medius (on the outer hip/butt area) plays an important role in pelvic stability, is called upon during the pushing stage of labor, and also helps draw the pubic bones back together after delivery. Here are three leg lifts to wake up that muscle.
1. Lying on your side, bend your knees so they’re approximately a 45 degree angle from your torso. Keep your heels together. Inhale, lift the top knee up as far as you can without rolling the pelvis up. Exhale, draw the inner knees back together. Repeat at least 10 breaths.

2. Start in the same position. Inhale, lift the entire top leg up, keeping the legs parallel to each other and the pelvis pointing forward. Exhale, return to the start position. Repeat at least 10 breaths.


Repeat all these moves on the second side. Feel free to take a child’s pose after each side.
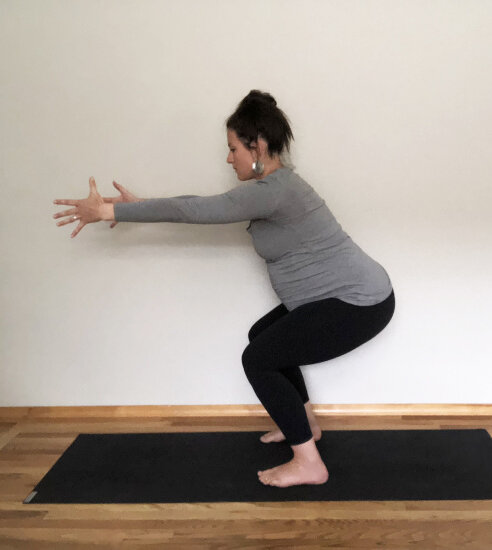
Chair squats: Come to standing in whatever way feels accessible to you. Place the feet hip width distance, or wider, keeping the toes pointing forward in line with each other. Spread the toes wide and heels firm on the floor. Keep the baby hugging in toward the spine. Exhale to sink the weight back into the heels, bending the knees as feels stable to you. Be sure you can see your toes in front of your knees at your lowest point. Hands can go out front, or forearms to thighs for more stability. Inhale, return to standing. Keep feet rooted, baby hugging to spine, shoulders down back, and ears over shoulders. Repeat 5-10 breaths.
BONUS: Here is a move we can incorporate mindful Kegel exercises. Ideally, in Kegel work, we should squeeze in slowly for a count of 5, hold for a count of 5, and release slowly for a count of 5. So, to incorporate these here: Inhale, stand up and squeeze in for 5, stand and hold for 5, exhale and squat/release for a count of 5.

Warrior 2: Another great pose to strengthen the outer hips. Turn to face the long edge of the mat and step as wide as feels stable. Turn the right toes to face the top of the mat, keep the left toes turned in slightly. Bring the fingers to the horizon and on the exhale, sink the tailbone toward the floor, bending the front knee towards 90 degrees. The front knee does NOT go past the front ankle, and faces directly forward over the toes. Imagine wrapping your outer right thigh toward the floor. Keep rooted into the back foot, hug baby to spine, and spin the heart towards the long edge of the mat. Breathe here 10 times, exhale to rise back up, and change sides.

Goddess Pose: Keep your wide stance from Warrior 2. This time, turn the toes slightly out and keep the heels rooted in. Inhale, and exhale to sink the tailbone toward the floor, bending both knees toward 90 degrees. Stack the knees over the ankles (you can bring the feet forward if you need to achieve this) and stay rooted into the heels. Imagine the inner thighs long, and the outer thighs wrapping down and back. Another pose you can practice Kegels if you wish. The position of my arms here is the abheya mudra, which symbolizes NO FEAR. Close your eyes if it feels right, stay 10 breaths, and visualize yourself entering this new stage of life radiantly and confidently.

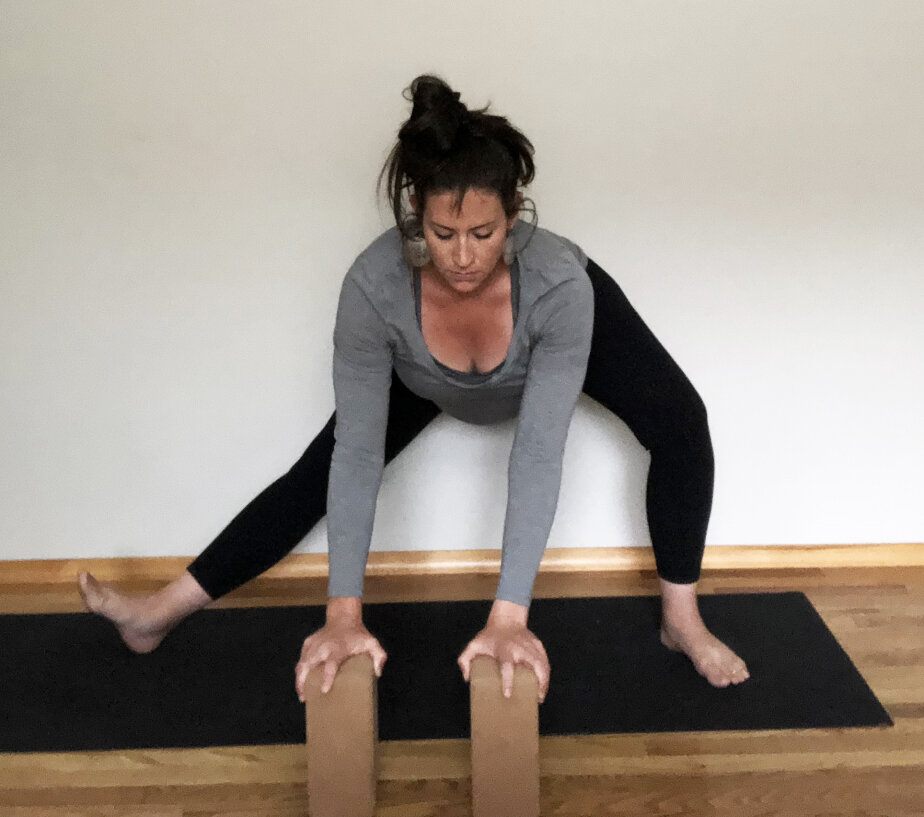
Pelvic floor/thigh stretch: Place two blocks or a chair in front of you. Keep this wide legged stance and bring your hands to your support. Keep the hips moving back, exhale and sink the tailbone, bending one knee and keeping it stacked over the ankle. Turn the straight leg thighbone toward the sky, keeping the heel rooting down and the toes lifted and flexed. Maintain a long spine, reaching tailbone to crown; if you feel your chest rounding, raise the level of support under your hands. Sink until you feel a gentle opening in your straight leg, stay for 5-10 breaths, and switch sides. Feel free to repeat each side if you feel called.
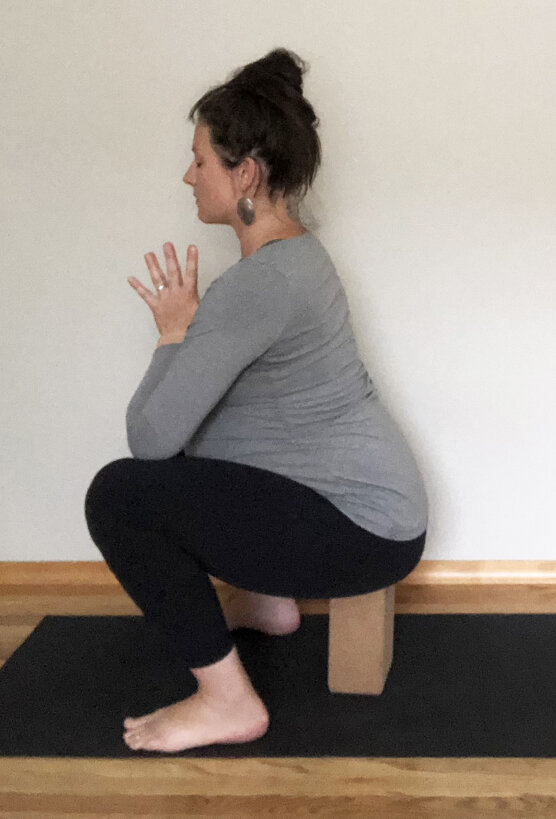
Yogi Squat: Step to the top of your mat, feet mat width. Bring a block, low stool, or stable stack of hard books behind you. Inhale, and exhale to sit the tailbone down, finding the block beneath your seat. (If you don’t need a block, it’s totally not required). Inner thighs and knees draw wide, while the heart remains lifted and open. Hands rest at heart center. Feel your tail rooted, and the crown of the head lift to the sky. This pose can INCREASE pelvic opening by up to 30%! And a tip from a midwife: The more straight forward we can have our feet (as opposed to turning our toes out), the better to increase this opening. It’s a more challenging pose this way, so be patient and maintain awareness of where you can go with this. Stay 10 breaths.
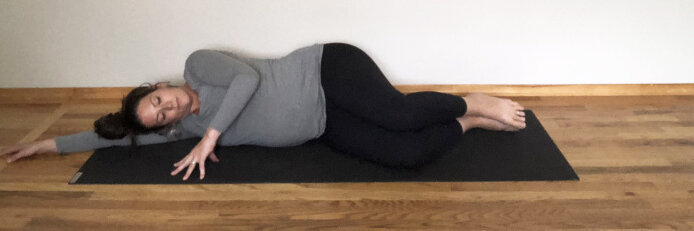
Reclined Goddess Pose: Ahhh, sweet rest. Using blocks, or pillows and blankets, we will use this pose to fully release and drop into a place of surrendered opening. This pose stretches the muscles of your inner thighs (the adductors). Tight adductors often correlate to a tight pelvic floor. Create an incline to fully support your spine and the back of your skull. Bring the soles of your feet together and drop the outer knees to the floor. Option to accept extra support and bring additional blocks/pillows/blankets underneath your outer thighs. We want a gentle opening, not a strained stretch. Rest the palms on the belly, or bring the hands to your sides with palms face up. Reacquaint yourself with the breath, and if you wish, go back to the breathing imagery we used at the beginning of practice. Remember your abheya mudra. Repeat one of these Prenatal Mantras.
Treat yourself to as long as you can in this pose.

Thank yourself for practicing and creating space in your day to take care of YOU and your babe. Peace&Love.